Docker集群
发布于:2019-1-30 15:28 作者:admin 浏览:3758 分类:系统架构[root@localhost docker]# docker swarm init
Swarm initialized: current node (vgc6172h94lo7vktpxs9hnb1y) is now a manager.
To add a worker to this swarm, run the following command:
docker swarm join \
--token SWMTKN-1-0dpoajwlnlig2pvbujiqzogodwilx6fezg7rgpjfsvob49vnzl-1lq8jjz0hqvcmd2ay91ornac6 \
192.168.100.136:2377
To add a manager to this swarm, run 'docker swarm join-token manager' and follow the instructions.
[root@localhost docker]# docker node ls
ID HOSTNAME STATUS AVAILABILITY MANAGER STATUS
vgc6172h94lo7vktpxs9hnb1y * localhost.localdomain Ready Active Leader
[root@localhost docker]# docker service create --name nginx --publish 80:80 --replicas 3 docker.io/idiswy/lnmp
td9afve2mqcs4l6t0w4dro8ve
[root@localhost docker]# docker service ls
ID NAME MODE REPLICAS IMAGE
td9afve2mqcs nginx replicated 3/3 docker.io/idiswy/lnmp:latest
[root@localhost docker]# docker service ps nginx
ID NAME IMAGE NODE DESIRED STATE CURRENT STATE ERROR PORTS
tnwlid5v447j nginx.1 docker.io/idiswy/lnmp:latest localhost.localdomain Running Running about a minute ago
f1h4cenjlj06 nginx.2 docker.io/idiswy/lnmp:latest localhost.localdomain Running Running about a minute ago
k6m7nqosffna nginx.3 docker.io/idiswy/lnmp:latest localhost.localdomain Running Running about a minute ago
[root@localhost docker]# docker service scale nginx=6
nginx scaled to 6
[root@localhost docker]# docker service ps nginx
ID NAME IMAGE NODE DESIRED STATE CURRENT STATE ERROR PORTS
tnwlid5v447j nginx.1 docker.io/idiswy/lnmp:latest localhost.localdomain Running Running 2 minutes ago
f1h4cenjlj06 nginx.2 docker.io/idiswy/lnmp:latest localhost.localdomain Running Running 2 minutes ago
k6m7nqosffna nginx.3 docker.io/idiswy/lnmp:latest localhost.localdomain Running Running 2 minutes ago
mxx8konbil7u nginx.4 docker.io/idiswy/lnmp:latest localhost.localdomain Running Running 20 seconds ago
v6hw4wkm1mf5 nginx.5 docker.io/idiswy/lnmp:latest localhost.localdomain Running Running 20 seconds ago
7mjvtqhxdiqm nginx.6 docker.io/idiswy/lnmp:latest localhost.localdomain Running Running 20 seconds ago
[root@localhost docker]# docker ps
CONTAINER ID IMAGE COMMAND CREATED STATUS PORTS NAMES
25eb9d5a1a49 docker.io/idiswy/lnmp@sha256:ddb256e6834e5bd0dbaa0d9130ff94312ecdb1ae19669cc747e99620c4edd656 "/sbin/my_init" About a minute ago Up About a minute 80/tcp, 443/tcp nginx.5.v6hw4wkm1mf5cjvf82vet2f4w
0a1654460e59 docker.io/idiswy/lnmp@sha256:ddb256e6834e5bd0dbaa0d9130ff94312ecdb1ae19669cc747e99620c4edd656 "/sbin/my_init" About a minute ago Up About a minute 80/tcp, 443/tcp nginx.6.7mjvtqhxdiqm3bxwqmeepo0sh
ecba5be3df16 docker.io/idiswy/lnmp@sha256:ddb256e6834e5bd0dbaa0d9130ff94312ecdb1ae19669cc747e99620c4edd656 "/sbin/my_init" About a minute ago Up About a minute 80/tcp, 443/tcp nginx.4.mxx8konbil7uq0c9kydos5hei
148735b9e91b docker.io/idiswy/lnmp@sha256:ddb256e6834e5bd0dbaa0d9130ff94312ecdb1ae19669cc747e99620c4edd656 "/sbin/my_init" 3 minutes ago Up 3 minutes 80/tcp, 443/tcp nginx.2.f1h4cenjlj064nfmkyddufze0
dafd4c20c955 docker.io/idiswy/lnmp@sha256:ddb256e6834e5bd0dbaa0d9130ff94312ecdb1ae19669cc747e99620c4edd656 "/sbin/my_init" 3 minutes ago Up 3 minutes 80/tcp, 443/tcp nginx.3.k6m7nqosffnayodp1qjph7o02
020f1099d809 docker.io/idiswy/lnmp@sha256:ddb256e6834e5bd0dbaa0d9130ff94312ecdb1ae19669cc747e99620c4edd656 "/sbin/my_init" 3 minutes ago Up 3 minutes 80/tcp, 443/tcp nginx.1.tnwlid5v447jl61kh8ukg8eob
CentOS构建Docker2
发布于:2019-1-30 9:03 作者:admin 浏览:3423 分类:系统架构查看版本
[root@localhost ~]# docker version
Client:
Version: 1.13.1
API version: 1.26
Package version: docker-1.13.1-88.git07f3374.el7.centos.x86_64
Go version: go1.9.4
Git commit: 07f3374/1.13.1
Built: Fri Dec 7 16:13:51 2018
OS/Arch: linux/amd64
Server:
Version: 1.13.1
API version: 1.26 (minimum version 1.12)
Package version: docker-1.13.1-88.git07f3374.el7.centos.x86_64
Go version: go1.9.4
Git commit: 07f3374/1.13.1
Built: Fri Dec 7 16:13:51 2018
OS/Arch: linux/amd64
Experimental: false
搜索容器镜像
[root@localhost ~]# docker search centos
INDEX NAME DESCRIPTION STARS OFFICIAL AUTOMATED
docker.io docker.io/centos The official build of CentOS. 5147 [OK]
docker.io docker.io/ansible/centos7-ansible Ansible on Centos7 119 [OK]
docker.io docker.io/jdeathe/centos-ssh CentOS-6 6.10 x86_64 / CentOS-7 7.5.1804 x... 106 [OK]
docker.io docker.io/consol/centos-xfce-vnc Centos container with "headless" VNC sessi... 78 [OK]
docker.io docker.io/imagine10255/centos6-lnmp-php56 centos6-lnmp-php56 50 [OK]
docker.io docker.io/centos/mysql-57-centos7 MySQL 5.7 SQL database server 45
docker.io docker.io/tutum/centos Simple CentOS docker image with SSH access 43
docker.io docker.io/openshift/base-centos7 A Centos7 derived base image for Source-To... 39
docker.io docker.io/gluster/gluster-centos Official GlusterFS Image [ CentOS-7 + Glu... 38 [OK]
docker.io docker.io/centos/postgresql-96-centos7 PostgreSQL is an advanced Object-Relationa... 37
docker.io docker.io/centos/python-35-centos7 Platform for building and running Python 3... 33
docker.io docker.io/kinogmt/centos-ssh CentOS with SSH 25 [OK]
docker.io docker.io/openshift/jenkins-2-centos7 A Centos7 based Jenkins v2.x image for use... 20
docker.io docker.io/centos/php-56-centos7 Platform for building and running PHP 5.6 ... 19
docker.io docker.io/pivotaldata/centos-gpdb-dev CentOS image for GPDB development. Tag nam... 10
docker.io docker.io/openshift/wildfly-101-centos7 A Centos7 based WildFly v10.1 image for us... 6
docker.io docker.io/openshift/jenkins-1-centos7 DEPRECATED: A Centos7 based Jenkins v1.x i... 4
docker.io docker.io/darksheer/centos Base Centos Image -- Updated hourly 3 [OK]
docker.io docker.io/pivotaldata/centos Base centos, freshened up a little with a ... 2
docker.io docker.io/pivotaldata/centos-mingw Using the mingw toolchain to cross-compile... 2
docker.io docker.io/blacklabelops/centos CentOS Base Image! Built and Updates Daily! 1 [OK]
docker.io docker.io/pivotaldata/centos-gcc-toolchain CentOS with a toolchain, but unaffiliated ... 1
docker.io docker.io/pivotaldata/centos7-build CentosOS 7 image for GPDB compilation 0
docker.io docker.io/pivotaldata/centos7-test CentosOS 7 image for GPDB testing 0
docker.io docker.io/smartentry/centos centos with smartentry 0 [OK]
下载容器镜像
[root@localhost ~]# docker pull docker.io/centos
Using default tag: latest
Trying to pull repository docker.io/library/centos ...
latest: Pulling from docker.io/library/centos
5e6ec7f28fb7: Pull complete
566e675a8212: Pull complete
ef5a8026039b: Pull complete
22ecb0106557: Pull complete
91cc511c603e: Pull complete
Digest: sha256:184e5f35598e333bfa7de10d8fb1cebb5ee4df5bc0f970bf2b1e7c7345136426
Status: Downloaded newer image for docker.io/centos:latest
查看容器镜像
[root@localhost ~]# docker images centos
REPOSITORY TAG IMAGE ID CREATED SIZE
docker.io/centos latest 1e1148e4cc2c 7 weeks ago 202 MB
运行容器镜像
[root@localhost ~]# docker run centos echo "Hello Centos"
Hello Centos
命令行运行容器镜像
[root@localhost ~]# docker run -t -i centos /bin/bash
[root@4bf88ec1e25e /]# echo "Hello Centos"
Hello Centos
保存对容器的修改
[root@localhost ~]# docker ps -l
CONTAINER ID IMAGE COMMAND CREATED STATUS PORTS NAMES
4bf88ec1e25e centos "/bin/bash" About a minute ago Exited (0) 5 seconds ago mystifying_kilby
[root@localhost ~]# docker commit -m="Hello Centos" 4bf88ec1e25e hellocentos
sha256:05c7c5c8c6f1ef66736cd1c6256cdd94629263ff67375e78e040e34dce2fb548
检查运行中的镜像
[root@localhost ~]# docker run hellocentos echo "Hello Centos"
WARNING: IPv4 forwarding is disabled. Networking will not work.
Hello Centos
[root@localhost ~]# docker inspect hellocentos
[
{
"Id": "sha256:05c7c5c8c6f1ef66736cd1c6256cdd94629263ff67375e78e040e34dce2fb548",
"RepoTags": [
"hellocentos:latest"
],
"RepoDigests": [],
"Parent": "sha256:1e1148e4cc2c148c6890a18e3b2d2dde41a6745ceb4e5fe94a923d811bf82ddb",
"Comment": "Hello Centos",
"Created": "2019-01-29T02:15:06.601658579Z",
"Container": "4bf88ec1e25ebb0b91dd80fce5e26138c8f955f4edeb6c778422af65a66c7b6d",
"ContainerConfig": {
"Hostname": "4bf88ec1e25e",
"Domainname": "",
"User": "",
"AttachStdin": true,
"AttachStdout": true,
"AttachStderr": true,
"Tty": true,
"OpenStdin": true,
"StdinOnce": true,
"Env": [
"PATH=/usr/local/sbin:/usr/local/bin:/usr/sbin:/usr/bin:/sbin:/bin"
],
"Cmd": [
"/bin/bash"
],
"Image": "centos",
"Volumes": null,
"WorkingDir": "",
"Entrypoint": null,
"OnBuild": null,
"Labels": {
"org.label-schema.build-date": "20181205",
"org.label-schema.license": "GPLv2",
"org.label-schema.name": "CentOS Base Image",
"org.label-schema.schema-version": "1.0",
"org.label-schema.vendor": "CentOS"
}
},
"DockerVersion": "1.13.1",
"Author": "",
"Config": {
"Hostname": "",
"Domainname": "",
"User": "",
"AttachStdin": false,
"AttachStdout": false,
"AttachStderr": false,
"Tty": false,
"OpenStdin": false,
"StdinOnce": false,
"Env": [
"PATH=/usr/local/sbin:/usr/local/bin:/usr/sbin:/usr/bin:/sbin:/bin"
],
"Cmd": [
"/bin/bash"
],
"Image": "",
"Volumes": null,
"WorkingDir": "",
"Entrypoint": null,
"OnBuild": null,
"Labels": {
"org.label-schema.build-date": "20181205",
"org.label-schema.license": "GPLv2",
"org.label-schema.name": "CentOS Base Image",
"org.label-schema.schema-version": "1.0",
"org.label-schema.vendor": "CentOS"
}
},
"Architecture": "amd64",
"Os": "linux",
"Size": 201779629,
"VirtualSize": 201779629,
"GraphDriver": {
"Name": "overlay2",
"Data": {
"LowerDir": "/var/lib/docker/overlay2/2e17ffe2a2acae3ca7b05851e5b2a8f4858bdec98b9ffeddaff1416851167d83/diff",
"MergedDir": "/var/lib/docker/overlay2/6cbdbc6d1560ec1fe0b608e1dc80dcb4088cebbbbe77d7e269ac13732c711a00/merged",
"UpperDir": "/var/lib/docker/overlay2/6cbdbc6d1560ec1fe0b608e1dc80dcb4088cebbbbe77d7e269ac13732c711a00/diff",
"WorkDir": "/var/lib/docker/overlay2/6cbdbc6d1560ec1fe0b608e1dc80dcb4088cebbbbe77d7e269ac13732c711a00/work"
}
},
"RootFS": {
"Type": "layers",
"Layers": [
"sha256:071d8bd765171080d01682844524be57ac9883e53079b6ac66707e192ea25956",
"sha256:e0a311bc74f5b5421dc5c135921dece63824e1cce9e5f5717d07878315d3728a"
]
}
}
]
发布自己的镜像
[root@localhost ~]# docker commit -m "my centos" 4bf88ec1e25e wangcnc2005/centos
sha256:4a3a837b38d77a5024b22cf0265f69eef7a3b3ccb32c2f2c7ca3c5d52edb2320
[root@localhost ~]# docker login
Login with your Docker ID to push and pull images from Docker Hub. If you don't have a Docker ID, head over to https://hub.docker.com to create one.
Username: wangcnc2005
Password:
Login Succeeded
[root@localhost ~]# docker push wangcnc2005/centos:latest
The push refers to a repository [docker.io/wangcnc2005/centos]
e0a311bc74f5: Pushed
071d8bd76517: Pushed
latest: digest: sha256:704978e57bd5486f145467a3ab314434bc02041a0f1aae137f43a5c81aea2506 size: 736
[root@localhost ~]# docker search wangcnc2005
INDEX NAME DESCRIPTION STARS OFFICIAL AUTOMATED
docker.io docker.io/wangcnc2005/centos my centos 0
容器的删除
[root@localhost ~]# docker commit -m="Hello Centos" 4bf88ec1e25e hello_centos
sha256:3e99e17de7d4de201482f97635780ad7872cea5a8ce5a1a70312ce4cd330cf40
[root@localhost ~]# docker images|grep centos
hello_centos latest 3e99e17de7d4 5 seconds ago 202 MB
hellocentos latest 05c7c5c8c6f1 21 hours ago 202 MB
docker.io/centos latest 1e1148e4cc2c 7 weeks ago 202 MB
[root@localhost ~]# docker rmi hello_centos
Untagged: hello_centos:latest
Deleted: sha256:3e99e17de7d4de201482f97635780ad7872cea5a8ce5a1a70312ce4cd330cf40
[root@localhost ~]# docker images|grep centos
REPOSITORY TAG IMAGE ID CREATED SIZE
hellocentos latest 05c7c5c8c6f1 21 hours ago 202 MB
docker.io/centos latest 1e1148e4cc2c 7 weeks ago 202 MBCentOS构建Docker
发布于:2019-1-25 10:08 作者:admin 浏览:3518 分类:系统架构1.安装
[root@localhost test]# yum install docker
2.启动docker
[root@localhost test]# systemctl start docker
3.运行hello-world
[root@localhost test]# docker run hello-world
Hello from Docker!
This message shows that your installation appears to be working correctly.
To generate this message, Docker took the following steps:
1. The Docker client contacted the Docker daemon.
2. The Docker daemon pulled the "hello-world" image from the Docker Hub.
(amd64)
3. The Docker daemon created a new container from that image which runs the
executable that produces the output you are currently reading.
4. The Docker daemon streamed that output to the Docker client, which sent it
to your terminal.
To try something more ambitious, you can run an Ubuntu container with:
$ docker run -it ubuntu bash
Share images, automate workflows, and more with a free Docker ID:
https://hub.docker.com/
For more examples and ideas, visit:
https://docs.docker.com/get-started/
4.Docker 以 ubuntu15.10 镜像创建一个新容器,然后在容器里执行 bin/echo "Hello world",然后输出结果
[root@localhost test]#docker run ubuntu:15.10 /bin/echo "Hello world"
Hello world
5.通过docker的两个参数 -i -t,让docker运行的容器实现"对话"的能力
[root@localhost test]# docker run -i -t ubuntu:15.10 /bin/bash
root@8b6cdcd4f1bb:/# ls
bin boot dev etc home lib lib64 media mnt opt proc root run sbin srv sys tmp usr var
6.后台模式运行命令
[root@localhost test]# docker run -d ubuntu:15.10 /bin/sh -c "while true; do echo hello world; sleep 1; done"
1472118a21aa6d4931b108f75f2d4b3fadefe6bd2e89317245f3a9b1f286930e
[root@localhost test]# docker ps
CONTAINER ID IMAGE COMMAND CREATED STATUS PORTS NAMES
1472118a21aa ubuntu:15.10 "/bin/sh -c 'while..." 2 minutes ago Up 2 minutes loving_montalcini
[root@localhost test]# docker logs 1472118a21aa
hello world
hello world
hello world
hello world
[root@localhost test]# docker stop 1472118a21aa
1472118a21aa
[root@localhost test]# docker ps
CONTAINER ID IMAGE COMMAND CREATED STATUS PORTS NAMES
7.列出镜像列表
[root@localhost test]# docker images
REPOSITORY TAG IMAGE ID CREATED SIZE
docker.io/hello-world latest fce289e99eb9 3 weeks ago 1.84 kB
docker.io/ubuntu 15.10 9b9cb95443b5 2 years ago 137 MB
8.搜索镜像
[root@localhost test]# docker search lnmp
INDEX NAME DESCRIPTION STARS OFFICIAL AUTOMATED
docker.io docker.io/imagine10255/centos6-lnmp-php56 centos6-lnmp-php56 50 [OK]
docker.io docker.io/twang2218/lnmp-nginx 这是 LNMP 示例中的 nginx 镜像 16 [OK]
docker.io docker.io/winstonpro/lnmp based on ubuntu 14.04 14
docker.io docker.io/maxwhale/ubuntu14-lnmp1.2 Ubuntu14.04 lnmp1.2 9 [OK]
docker.io docker.io/dzer/lnmp lnmp环境 8
docker.io docker.io/domainer/centos-lnmp 5 [OK]
docker.io docker.io/duckll/lnmp webservice 4 [OK]
docker.io docker.io/maxwhale/lnmp-docker LNMP Docker 4 [OK]
docker.io docker.io/evagle/lnmp ubuntu14.04 + nginx + mysql + php + redis 3
docker.io docker.io/idiswy/lnmp Ubuntu 16.04 + nginx 1.8.x + php7 + MySQL ... 3
docker.io docker.io/c21xdx/lnmp13_cen6 php5.4 1 [OK]
docker.io docker.io/erguotou/docker-centos6-lnmp lnmp environment in centos6 1 [OK]
docker.io docker.io/fbraz3/lnmp An easy-to-use LNMP/LEMP image, with Ubunt... 1
docker.io docker.io/gatherchou/docker-lnmp docker-lnmp 1 [OK]
docker.io docker.io/inteye/lnmp LNMP1.2 (Linux, Nginx, Mysql, PHP). For de... 1
docker.io docker.io/turtlell/lnmp first lnmp demo 1
docker.io docker.io/twang2218/lnmp-php 这是 LNMP Docker 容器互联示例的 php 镜像 1 [OK]
docker.io docker.io/zhaojianhui/lnmp LNMP环境 1
docker.io docker.io/dahaitech/lnmp-douyou douyou test lnmp 0 [OK]
docker.io docker.io/huangguoji/lnmp lnmp.org的包 0
docker.io docker.io/jamesatwork/docker-lnmpwp A docker of LNMP & WordPress 0 [OK]
docker.io docker.io/sixian67/lnmp this is my lnmp 0
docker.io docker.io/thinksvip/lnmp LNMP docker production environment 0 [OK]
docker.io docker.io/twang2218/lnmp-mysql This is the MySQL image of the LNMP docker... 0 [OK]
docker.io docker.io/zshtom/lnmp lnmp in centos 7 0
9.下载镜像
[root@localhost test]# docker pull docker.io/idiswy/lnmp
Using default tag: latest
Trying to pull repository docker.io/idiswy/lnmp ...
latest: Pulling from docker.io/idiswy/lnmp
f069f1d21059: Pull complete
ecbeec5633cf: Pull complete
ea6f18256d63: Pull complete
54bde7b02897: Pull complete
a3ed95caeb02: Pull complete
ce9e695a6234: Pull complete
346026b9659b: Pull complete
929099c3258a: Pull complete
064503d36445: Pull complete
4c1032a6f902: Pull complete
882f4453d31b: Pull complete
Digest: sha256:ddb256e6834e5bd0dbaa0d9130ff94312ecdb1ae19669cc747e99620c4edd656
Status: Downloaded newer image for docker.io/idiswy/lnmp:latest
[root@localhost test]# docker images
REPOSITORY TAG IMAGE ID CREATED SIZE
docker.io/hello-world latest fce289e99eb9 3 weeks ago 1.84 kB
docker.io/idiswy/lnmp latest fbd7b7c5428e 2 years ago 335 MB
docker.io/ubuntu 15.10 9b9cb95443b5 2 years ago 137 MB
10.从已经创建的容器中更新镜像,并且提交这个镜像
[root@localhost test]# docker run -t -i fbd7b7c5428e /bin/bash
[root@e594c6c84c47:/sbin# apt-get update
Get:1 http://archive.ubuntu.com/ubuntu xenial InRelease [247 kB]
Get:2 http://archive.ubuntu.com/ubuntu xenial-updates InRelease [109 kB]
Get:3 http://archive.ubuntu.com/ubuntu xenial-security InRelease [109 kB]
Get:4 http://archive.ubuntu.com/ubuntu xenial/main Sources [1103 kB]
Get:5 http://archive.ubuntu.com/ubuntu xenial/restricted Sources [5179 B]
Get:6 http://archive.ubuntu.com/ubuntu xenial/universe Sources [9802 kB]
Get:7 http://nginx.org/packages/ubuntu xenial InRelease [4339 B]
Get:8 http://nginx.org/packages/ubuntu xenial/nginx Sources [14.1 kB]
Get:9 http://nginx.org/packages/ubuntu xenial/nginx amd64 Packages [20.1 kB]
Get:10 http://archive.ubuntu.com/ubuntu xenial/main amd64 Packages [1558 kB]
Get:11 http://archive.ubuntu.com/ubuntu xenial/restricted amd64 Packages [14.1 kB]
Get:12 http://archive.ubuntu.com/ubuntu xenial/universe amd64 Packages [9827 kB]
Get:13 http://archive.ubuntu.com/ubuntu xenial-updates/main Sources [415 kB]
Get:14 http://archive.ubuntu.com/ubuntu xenial-updates/restricted Sources [2684 B]
Get:15 http://archive.ubuntu.com/ubuntu xenial-updates/universe Sources [303 kB]
Get:16 http://archive.ubuntu.com/ubuntu xenial-updates/main amd64 Packages [1166 kB]
Get:17 http://archive.ubuntu.com/ubuntu xenial-updates/restricted amd64 Packages [13.1 kB]
Get:18 http://archive.ubuntu.com/ubuntu xenial-updates/universe amd64 Packages [929 kB]
Get:19 http://archive.ubuntu.com/ubuntu xenial-security/main Sources [175 kB]
Get:20 http://archive.ubuntu.com/ubuntu xenial-security/restricted Sources [2243 B]
Get:21 http://archive.ubuntu.com/ubuntu xenial-security/universe Sources [116 kB]
Get:22 http://archive.ubuntu.com/ubuntu xenial-security/multiverse Sources [3513 B]
Get:23 http://archive.ubuntu.com/ubuntu xenial-security/main amd64 Packages [767 kB]
Get:24 http://archive.ubuntu.com/ubuntu xenial-security/restricted amd64 Packages [12.7 kB]
Get:25 http://archive.ubuntu.com/ubuntu xenial-security/universe amd64 Packages [527 kB]
Get:26 http://archive.ubuntu.com/ubuntu xenial-security/multiverse amd64 Packages [6119 B]
Fetched 27.3 MB in 4min 1s (113 kB/s)
Reading package lists... Done
11.通过命令 docker commit来提交容器副本,创建的目标镜像名
//-m:提交的描述信息,-a:指定镜像作者,d11aaceba824:容器ID,test/lnmp:v1 :指定要创建的目标镜像名
[root@localhost test]# docker commit -m="LNMP" -a="test" d11aaceba824 test/lnmp:v1
sha256:30a7c473b0ca8e02c1d1ac0ef3188e09d12649faf60cede37e2d7ccb877331e6
[root@localhost test]# docker images
REPOSITORY TAG IMAGE ID CREATED SIZE
test/lnmp v1 30a7c473b0ca 3 minutes ago 335 MB
docker.io/hello-world latest fce289e99eb9 3 weeks ago 1.84 kB
docker.io/idiswy/lnmp latest fbd7b7c5428e 2 years ago 335 MB
docker.io/ubuntu 15.10 9b9cb95443b5 2 years ago 137 MB
12.设置镜像标签
docker tag 镜像ID,这里是 860c279d2fec ,用户名称、镜像源名(repository name)和新的标签名(tag)。
使用 docker images 命令可以看到,ID为860c279d2fec的镜像多一个标签。
[root@localhost test]# docker tag 30a7c473b0ca test/lnmp:tagv1
[root@localhost test]# docker images
REPOSITORY TAG IMAGE ID CREATED SIZE
test/lnmp tagv1 30a7c473b0ca 15 minutes ago 335 MB
test/lnmp v1 30a7c473b0ca 15 minutes ago 335 MB
docker.io/hello-world latest fce289e99eb9 3 weeks ago 1.84 kB
docker.io/idiswy/lnmp latest fbd7b7c5428e 2 years ago 335 MB
docker.io/ubuntu 15.10 9b9cb95443b5 2 years ago 137 MB
13:通过 Dockerfile 构建 hellodocker
[root@localhost test]# cat Dockerfile
FROM centos
LABEL maintainer="Hello Docker"
RUN /bin/bash
CMD ["echo","Hello Docker"]
[root@localhost test]# docker build -t hellodocker .
Sending build context to Docker daemon 2.048 kB
Step 1/4 : FROM centos
Trying to pull repository docker.io/library/centos ...
latest: Pulling from docker.io/library/centos
a02a4930cb5d: Pull complete
Digest: sha256:184e5f35598e333bfa7de10d8fb1cebb5ee4df5bc0f970bf2b1e7c7345136426
Status: Downloaded newer image for docker.io/centos:latest
---> 1e1148e4cc2c
Step 2/4 : LABEL maintainer "Hello Docker"
---> Running in 20e2be20052b
---> f255f97c4984
Removing intermediate container 20e2be20052b
Step 3/4 : RUN /bin/bash
---> Running in a195ff956608
---> ec18faa97f10
Removing intermediate container a195ff956608
Step 4/4 : CMD echo Hello Docker
---> Running in fcd177b109d9
---> 075486018a06
Removing intermediate container fcd177b109d9
Successfully built 075486018a06
[root@localhost test]# docker images hellodocker
REPOSITORY TAG IMAGE ID CREATED SIZE
hellodocker latest 075486018a06 About a minute ago 202 MB
[root@localhost test]# docker run -i -t hellodocker
Hello Docker
服务器篇
发布于:2019-1-12 16:46 作者:admin 浏览:2975LNMP的安装
负载均衡
数据库
大数据
人工智能(Python)推荐系统
ELK系统(日志系统)(待完善)
监控系统(Zabbix))(待完善)
 智能文章系统实战
发布于:2019-1-12 12:15 作者:admin 浏览:3754
智能文章系统实战:以新闻内容系统为起点,从数据创建,新闻内容后台的管理,新闻内容的前端显示,手机网页版显示,内容全文搜素,小程序, android版, ios版(swift语言)的开发,python人工智能内容的分类和推荐,大数据Hadoop,Hive,HBase 的应用系统统计. 只展示最基本功能,不涉及框架,性能,安全方面的考虑。
智能文章系统实战-创建数据库(1)
智能文章系统实战-PHP现实的文章增删改查,MVC架构(2)
智能文章系统实战-数据采集(3)
智能文章系统实战-文章全文搜索安装和测试(4)
智能文章系统实战-文章全文搜索应用(5)
智能文章系统实战-H5页面或者微信版(6)
智能文章系统实战-移动API(7)
智能文章系统实战-Android文章客户端(8)
智能文章系统实战-iOS文章客户端(9)
智能文章系统实战-微信小程序(10)
智能文章系统实战-人工智能机器学习预测文章分类(Python版)(11)
智能文章系统实战-人工智能机器学习之内容推荐(Python版)(12)
智能文章系统实战-数据统计PHP版(13)
智能文章系统实战-Hadoop海量数据统计(14)
智能文章系统实战-Hive数据仓库(15)
智能文章系统实战-统计数据展示(javascript版)(16)
智能文章系统实战-统计数据展示Pyhton版本(17)
智能文章系统实战-统计数据展示Pyhton版本(17)
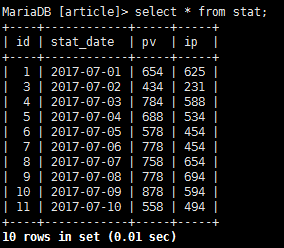
发布于:2018-7-16 18:32 作者:admin 浏览:31531. 查看数据
2. 图形代码
#!/usr/bin/python3
# -*- coding: utf-8 -*-


#引入库
import matplotlib
matplotlib.use('Agg')
import matplotlib.pyplot as plt
import pymysql
from matplotlib.font_manager import *

#定义自定义字体,文件名从1.b查看系统中文字体中来
myfont = FontProperties(fname='/usr/share/fonts/stix/simsun.ttc')
#解决负号'-'显示为方块的问题
matplotlib.rcParams['axes.unicode_minus']=False

#初始化变量
x=[]
y1=[]
y2=[]


# 打开数据库连接
db = pymysql.connect("localhost","root","","article" )

# 使用 cursor() 方法创建一个游标对象 cursor
cursor = db.cursor()

# SQL 查询语句
sql = "SELECT stat_date,pv,ip FROM stat ORDER BY id DESC LIMIT 0,10"
try:
	# 执行SQL语句
	cursor.execute(sql)

	# 获取所有记录列表
	results = cursor.fetchall()
	for row in results:
		x.append(row[0])
		y1.append(row[1])
		y2.append(row[2])

	# 打印结果
	#print(x)
	#print(y1)
	#print(y2)

except:
	print ("Error!")


# 关闭数据库连接
db.close()


#绘制图形
plt.figure(figsize=(12,8))
plt.plot(x,y1,label='PV',color='r',marker='o')
plt.plot(x,y2,label='PV',color='b',marker='s')
plt.xlabel(u'日期',fontproperties=myfont)
plt.ylabel(u'统计数量',fontproperties=myfont)
plt.title(u'数据统计',fontproperties=myfont)
plt.xticks(rotation=0)
# 设置数字标签
for a, b in zip(x, y1):
    plt.text(a, b, b, ha='center', va='bottom', fontsize=20)
for a, b in zip(x, y2):
    plt.text(a, b, b, ha='center', va='bottom', fontsize=20)
plt.legend()
#plt.show()
plt.savefig("stat.png")
3.显示图形
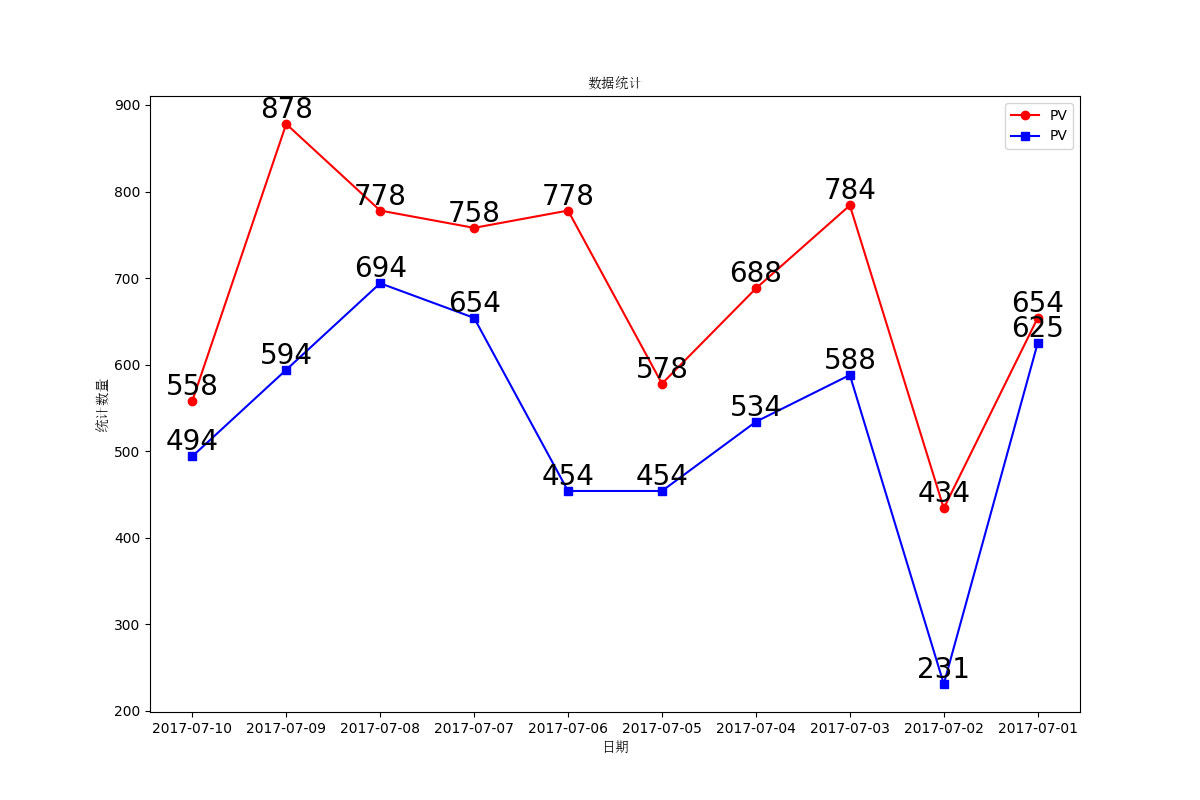
智能文章系统实战-统计数据展示(16)
发布于:2018-7-13 15:58 作者:admin 浏览:32601. 查看统计数据
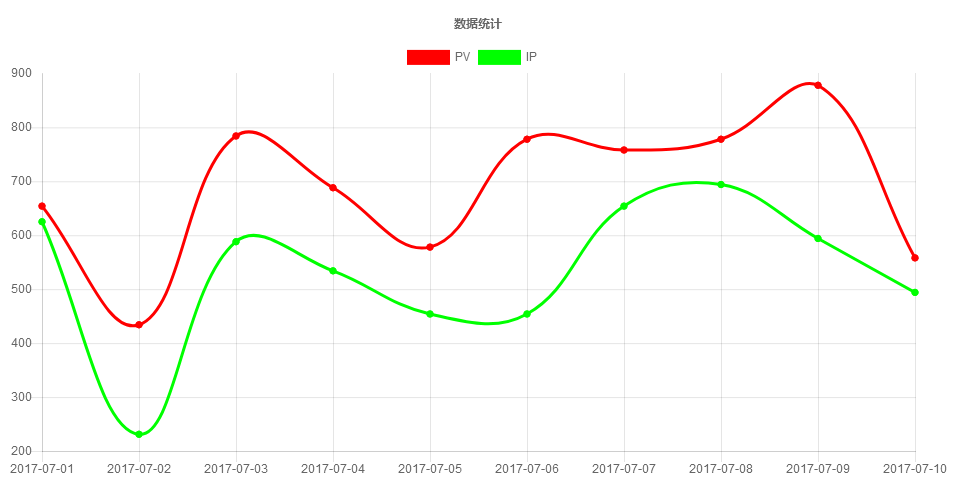
2. 统计代码(PHP+JS)
<?php
header("Content-Type:text/html;charset=utf-8");
error_reporting(0);

//变量初始化
$title="数据统计";
$labelsArray=array();
$pvArray=array();
$ipArray=array();

//查询统计表数据
$mysqli = new mysqli('localhost', 'root', '', 'article');
if ($mysqli->connect_errno) {
    printf("数据库连接错误!");
    exit();
}

$sql="SELECT * FROM stat ORDER BY id DESC LIMIT 10";
$result = $mysqli->query($sql);
if($result)
{
	while($row = $result->fetch_array(MYSQLI_ASSOC))
	{
	  $labelsArray[]=$row['stat_date'];
	  $pvArray[]=$row['pv'];
	  $ipArray[]=$row['ip'];
	}
}
$mysqli->close();


//合成统计图形需要的数据
$labelsStr="";
$pvStr=0;
$ipStr=0;
if($labelsArray)
{
	$labelsStr="'".implode("','",array_reverse($labelsArray))."'";
}
if($pvArray)
{
	$pvStr=implode(",",array_reverse($pvArray));
}
if($ipArray)
{
	$ipStr=implode(",",array_reverse($ipArray));
}
?>
<!DOCTYPE html>
<html lang="zh-CN">
<head>
    <meta charset="UTF-8">
    <meta http-equiv="content-type" content="text/html; charset=utf-8">
    <meta http-equiv="X-UA-Compatible" content="IE=edge,chrome=1"/>
    <meta name="viewport" content="width=device-width, initial-scale=1.0, minimum-scale=1.0, maximum-scale=1.0, user-scalable=no">
    <script src="https://cdnjs.cloudflare.com/ajax/libs/Chart.js/2.7.2/Chart.bundle.js"></script>
	<title>数据统计</title>
</head>
<body>
<div>
<body>
	<div style="width:70%;" >
		<canvas id="canvas" style="text-align:center;"></canvas>
	</div>
	<br>
	<br>

	<script>

		var config = {
			type: 'line',
			data: {
				labels: [<?=$labelsStr?>],
				datasets: [{
					label: 'PV',
					backgroundColor: "#FF0000",
					borderColor: "#FF0000",
					data: [<?=$pvStr?>],
					fill: false,
				}, {
					label: 'IP',
					fill: false,
					backgroundColor: "#00FF00",
					borderColor: "#00FF00",
					data: [<?=$ipStr?>],
				}]
			},
			options: {
				responsive: true,
				title: {
					display: true,
					text: '数据统计'
				}
			}
		};

		window.onload = function() {
			var ctx = document.getElementById('canvas').getContext('2d');
			new Chart(ctx, config);
		};


	</script>
</body>
</html>
3.查看统计图
智能文章系统实战-Hive数据仓库(15)
发布于:2018-7-12 16:07 作者:admin 浏览:35181. hive 安装
http://www.wangfeilong.cn/server/118.html
2.查看上节用Hadoop清洗过的数据pvlog.txt[root@localhost hive]# cat /tmp/pvlog.txt 192.168.100.1 1530460833 http://news.demo.com/h5.php?action=show&id=89 192.168.100.1 1530460803 http://news.demo.com/h5.php?action=show&id=128
3启动HIVE并且创建数据库
[root@localhost hive]# hive
which: no hbase in (/usr/local/soft/hive/bin:/usr/local/soft/Hadoop/hadoop/bin:/usr/local/soft/Hadoop/hadoop/sbin:/usr/local/soft/jdk1.8.0_17/bin:/usr/local/sbin:/usr/local/bin:/usr/sbin:/usr/bin:/root/bin)
SLF4J: Class path contains multiple SLF4J bindings.
SLF4J: Found binding in [jar:file:/usr/local/soft/hive/lib/log4j-slf4j-impl-2.6.2.jar!/org/slf4j/impl/StaticLoggerBinder.class]
SLF4J: Found binding in [jar:file:/usr/local/soft/Hadoop/hadoop/share/hadoop/common/lib/slf4j-log4j12-1.7.25.jar!/org/slf4j/impl/StaticLoggerBinder.class]
SLF4J: See http://www.slf4j.org/codes.html#multiple_bindings for an explanation.
SLF4J: Actual binding is of type [org.apache.logging.slf4j.Log4jLoggerFactory]

Logging initialized using configuration in jar:file:/usr/local/soft/hive/lib/hive-common-2.3.3.jar!/hive-log4j2.properties Async: true
Hive-on-MR is deprecated in Hive 2 and may not be available in the future versions. Consider using a different execution engine (i.e. spark, tez) or using Hive 1.X releases.

hive> CREATE DATABASE IF NOT EXISTS article;
OK
Time taken: 7.758 seconds

hive> show databases;
OK
article
default
demo
wordcount
Time taken: 0.229 seconds, Fetched: 4 row(s)


hive> use article;
OK
Time taken: 0.068 seconds
4.hive详细日志表
4.1 创建明细表
hive> create table pvlog(
    > ip string,
    > times string,
    > url string)
    > PARTITIONED BY (stat_date string)
    > row format delimited fields terminated by '\t' stored as textfile;
OK
Time taken: 0.582 seconds
4.2 加载文本数据到HIVE数据库表
hive> load data local inpath '/tmp/pvlog.txt' overwrite into table pvlog partition(stat_date='2018-07-01');
Loading data to table article.pvlog partition (stat_date=2018-07-01)
OK
Time taken: 2.383 seconds
4.3 查询明细表数据
hive> select * from pvlog where stat_date = '2018-07-01';
OK
192.168.100.1	1530460833	http://news.demo.com/h5.php?action=show&id=89	2018-07-01
192.168.100.1	1530460803	http://news.demo.com/h5.php?action=show&id=128	2018-07-01
Time taken: 4.96 seconds, Fetched: 2 row(s)
5.统计数据
5.1 创建统计表
hive> create table stat(
    > stat_date string,
    > pv int,
    > ip int
    > )
    > row format delimited fields terminated by '\t' stored as textfile;
OK
Time taken: 0.26 seconds
5.2 统计数据
hive> insert into stat
    > select stat_date,count(*) as pv,count(distinct(ip)) as ip from pvlog where stat_date = '2018-07-01' group by stat_date;
WARNING: Hive-on-MR is deprecated in Hive 2 and may not be available in the future versions. Consider using a different execution engine (i.e. spark, tez) or using Hive 1.X releases.
Query ID = root_20180710175116_136d9e36-a8fc-4d0d-9f91-93dd71aba321
Total jobs = 1
Launching Job 1 out of 1
Number of reduce tasks not specified. Estimated from input data size: 1
In order to change the average load for a reducer (in bytes):
  set hive.exec.reducers.bytes.per.reducer=<number>
In order to limit the maximum number of reducers:
  set hive.exec.reducers.max=<number>
In order to set a constant number of reducers:
  set mapreduce.job.reduces=<number>
Starting Job = job_1531202649478_0010, Tracking URL = http://localhost:8088/proxy/application_1531202649478_0010/
Kill Command = /usr/local/soft/Hadoop/hadoop/bin/hadoop job  -kill job_1531202649478_0010
Hadoop job information for Stage-1: number of mappers: 1; number of reducers: 1
2018-07-10 17:51:36,560 Stage-1 map = 0%,  reduce = 0%
2018-07-10 17:51:52,289 Stage-1 map = 100%,  reduce = 0%, Cumulative CPU 2.23 sec
2018-07-10 17:52:07,262 Stage-1 map = 100%,  reduce = 100%, Cumulative CPU 5.86 sec
MapReduce Total cumulative CPU time: 5 seconds 860 msec
Ended Job = job_1531202649478_0010
Loading data to table article.stat
MapReduce Jobs Launched:
Stage-Stage-1: Map: 1  Reduce: 1   Cumulative CPU: 5.86 sec   HDFS Read: 9792 HDFS Write: 83 SUCCESS
Total MapReduce CPU Time Spent: 5 seconds 860 msec
OK
Time taken: 53.74 seconds
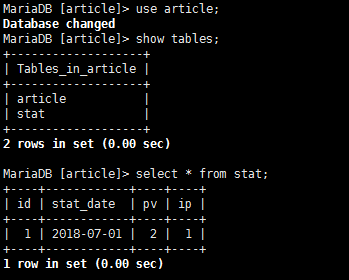
5.3 查询统计结果
hive> select * from stat;
OK
2018-07-01	2	1
Time taken: 0.36 seconds, Fetched: 1 row(s)
6.查看统计的数据文件
7.把统计导入MYSQL数据库
智能文章系统实战-Hadoop海量数据统计(14)
发布于:2018-7-10 17:15 作者:admin 浏览:29381.把hadoop添加到环境变量
#vi /etc/profile
export HADOOP_HOME=/usr/local/soft/Hadoop/hadoop
export PATH=${HADOOP_HOME}/bin:${HADOOP_HOME}/sbin:$PATH
export CLASSPATH=$($HADOOP_HOME/bin/hadoop classpath):$CLASSPATH

#source /etc/profile
2.启动hadoop
#hdfs namenode -format
#start-all.sh
#hadoop fs -mkdir -p HDFS_INPUT_PV_IP
3.查看案例日志
#cat /var/log/nginx/news.demo.com.access.log-20180701
192.168.100.1 - - [01/Jul/2018:15:59:48 +0800] "GET http://news.demo.com/h5.php HTTP/1.1" 200 3124 "-" "Mozilla/5.0 (Windows NT 6.1; WOW64) AppleWebKit/537.36 (KHTML, like Gecko) Chrome/63.0.3239.132 Safari/537.36" "-"
192.168.100.1 - - [01/Jul/2018:16:00:03 +0800] "GET http://news.demo.com/h5.php?action=show&id=128 HTTP/1.1" 200 1443 "http://news.demo.com/h5.php" "Mozilla/5.0 (Windows NT 6.1; WOW64) AppleWebKit/537.36 (KHTML, like Gecko) Chrome/63.0.3239.132 Safari/537.36" "-"
192.168.100.1 - - [01/Jul/2018:16:00:22 +0800] "GET http://news.demo.com/h5.php HTTP/1.1" 200 3124 "-" "Mozilla/5.0 (Windows NT 6.1; WOW64) AppleWebKit/537.36 (KHTML, like Gecko) Chrome/63.0.3239.132 Safari/537.36" "-"
192.168.100.1 - - [01/Jul/2018:16:00:33 +0800] "GET http://news.demo.com/h5.php?action=show&id=89 HTTP/1.1" 200 6235 "http://news.demo.com/h5.php" "Mozilla/5.0 (Windows NT 6.1; WOW64) AppleWebKit/537.36 (KHTML, like Gecko) Chrome/63.0.3239.132 Safari/537.36" "-"
4. 采集日志数据 (sh 脚本,hadoop 脚本,实际使用 配置计划任务每天00:01分处理昨天的日志)
#vi hadoopLog.sh

#!/bin/sh
#昨天的日期
yesterday=$(date --date='1 days ago' +%Y%m%d)
#测试案例日志日期
yesterday="20180701"
#hadoop命令行上传文件
hadoop fs -put /var/log/news.demo.com.access.log-${yesterday} HDFS_INPUT_PV_IP/${yesterday}.log


#sh hadoopLog.sh
5. Hadoop处理日志数据PHP之MAP
#vi /usr/local/soft/Hadoop/hadoop/demo/StatMap.php
<?php
error_reporting(0);
while (($line = fgets(STDIN)) !== false)
{
   if(stripos($line,'action=show')>0)
   {

		$words = preg_split('/(\s+)/', $line);
		echo $words[0].chr(9).strtotime(str_replace('/',' ',substr($words[3],1,11))." ".substr($words[3],13)).chr(9).$words[6].PHP_EOL;
   }
}
?>
6. Hadoop处理日志数据PHP之Reduce
#vi /usr/local/soft/Hadoop/hadoop/demo/StatReduce.php
<?php
error_reporting(0);
$fp=fopen('/tmp/pvlog.txt','w+');

$pvNum=0;
$ipNum=0;
$ipList=array();
while (($line = fgets(STDIN)) !== false)
{
	$pvNum=$pvNum+1;
	$tempArray=explode(chr(9),$line);
    $ip = trim($tempArray[0]);
	if(!in_array($ip,$ipList))
	{
		$ipList[]=$ip;
		$ipNum=$ipNum+1;
	}

	//把每行的详细数据记录文件中,用户HIVE统计和HBASE详细记录
	fwrite($fp,$line);
}

fclose($fp);


//把统计的插入MYSQL数据库
$yestoday=date("Y-m-d",time()-86400); //实际统计昨天的数据
$yestoday='2018-07-01'; //以2018-07-01的日志进行测试
$mysqli = new mysqli('localhost', 'root', '', 'article');
$sql="INSERT INTO stat SET stat_date='{$yestoday}',pv={$pvNum},ip={$ipNum}";
$mysqli->query($sql);
$mysqli->close();


echo "DATE=".$yestoday.PHP_EOL;
echo "PV=".$pvNum.PHP_EOL;
echo "IP=".$ipNum.PHP_EOL;


?>
7. Hadoop处理日志数据(流方式)
#hadoop jar /usr/local/soft/Hadoop/hadoop/share/hadoop/tools/lib/hadoop-streaming-2.9.1.jar -mapper /usr/local/soft/Hadoop/hadoop/demo/StatMap.php -reducer /usr/local/soft/Hadoop/hadoop/demo/StatReduce.php -input HDFS_INPUT_PV_IP/* -output HDFS_OUTPUT_PV_IP8.查看统计结果
9.查看数据库的统计结果
10.查看/tmp/pvlog.txt的清洗结果
11.重复运行处理数据,需要删除已经存在的输出目录
#hadoop fs -rm -r -f HDFS_OUTPUT_PV_IP
12.案例命令集合
#hadoop fs -mkidr -p HDFS_INPUT_PV_IP
#hadoop fs -put /var/log/nginx/news.demo.com.access.log-20180701 HDFS_INPUT_PV_IP
#hadoop jar /usr/local/soft/Hadoop/hadoop/share/hadoop/tools/lib/hadoop-streaming-2.9.1.jar  -mapper /usr/local/soft/Hadoop/hadoop/demo/StatMap.php -reducer /usr/local/soft/Hadoop/hadoop/demo/StatReduce.php  -input HDFS_INPUT_PV_IP/* -output HDFS_OUTPUT_PV_IP
#hadoop fs -cat HDFS_OUTPUT_PV_IP/*
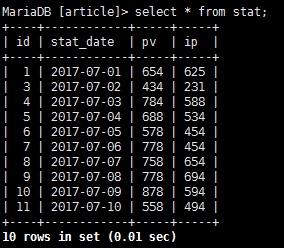
MariaDB [article]> select * from stat;
智能文章系统实战-数据统计(13)
发布于:2018-7-1 16:53 作者:admin 浏览:32951. 数据文件
#cat /var/log/nginx/news.demo.com.access.log-20180701
192.168.100.1 - - [01/Jul/2018:15:59:48 +0800] "GET http://news.demo.com/h5.php HTTP/1.1" 200 3124 "-" "Mozilla/5.0 (Windows NT 6.1; WOW64) AppleWebKit/537.36 (KHTML, like Gecko) Chrome/63.0.3239.132 Safari/537.36" "-"
192.168.100.1 - - [01/Jul/2018:16:00:03 +0800] "GET http://news.demo.com/h5.php?action=show&id=128 HTTP/1.1" 200 1443 "http://news.demo.com/h5.php" "Mozilla/5.0 (Windows NT 6.1; WOW64) AppleWebKit/537.36 (KHTML, like Gecko) Chrome/63.0.3239.132 Safari/537.36" "-"
192.168.100.1 - - [01/Jul/2018:16:00:22 +0800] "GET http://news.demo.com/h5.php HTTP/1.1" 200 3124 "-" "Mozilla/5.0 (Windows NT 6.1; WOW64) AppleWebKit/537.36 (KHTML, like Gecko) Chrome/63.0.3239.132 Safari/537.36" "-"
192.168.100.1 - - [01/Jul/2018:16:00:33 +0800] "GET http://news.demo.com/h5.php?action=show&id=89 HTTP/1.1" 200 6235 "http://news.demo.com/h5.php" "Mozilla/5.0 (Windows NT 6.1; WOW64) AppleWebKit/537.36 (KHTML, like Gecko) Chrome/63.0.3239.132 Safari/537.36" "-"
2. 数据表结构
CREATE TABLE IF NOT EXISTS `stat` (
  `id` int(11) NOT NULL AUTO_INCREMENT,
  `stat_date` varchar(30) NOT NULL DEFAULT '' COMMENT '统计日期',
  `pv` int(11) NOT NULL DEFAULT '0' COMMENT 'PV量',
  `ip` int(11) NOT NULL DEFAULT '0' COMMENT 'IP量',
  PRIMARY KEY (`id`),
  UNIQUE KEY `stat_date` (`stat_date`)
) ENGINE=InnoDB DEFAULT CHARSET=utf8 COMMENT='文章阅读统计' AUTO_INCREMENT=1 ;
3. 统计代码
<?php
header("Content-Type:text/html;charset=utf-8");
error_reporting(E_ALL & ~E_NOTICE);
date_default_timezone_set('PRC');


$pv=0;
$ip=0;
$ipList=array();

$yestoday=date("Y-m-d",time()-86400); //实际读取昨天的日志
$yestoday='2018-07-01'; //读取2018-07-01的日志,用来测试
$fileName=date('Ymd',strtotime($yestoday));
//读取日志文件
$logPath="/var/log/nginx/news.demo.com.access.log-{$fileName}";
if(file_exists($logPath))
{
	$fileContents=file_get_contents($logPath);
	$fileArray=explode("\n",$fileContents);
	foreach($fileArray as $str)
	{
		//过滤只有阅读文章内容的数据
		if(strpos($str,'action=show'))
		{

			$tempArray=explode(" ",$str);

			//统计PV
			$pv=$pv+1;

			//统计IP
			$userip=$tempArray[0];
			if(!in_array($userip,$ipList))
			{
				$ipList[]=$userip;
				$ip=$ip+1;
			}
		}
	}
}


//插入MYSQL数据库
$mysqli = new mysqli('localhost', 'root', '', 'article');
$sql="INSERT INTO stat SET stat_date='{$yestoday}',pv={$pv},ip={$ip}";
$mysqli->query($sql);
$mysqli->close();


?>
4. 统计结果
//统计结果
MariaDB [article]> select * from stat;
+----+------------+----+----+
| id | stat_date  | pv | ip |
+----+------------+----+----+
|  1 | 2018-07-01 |  2 |  1 |
+----+------------+----+----+
1 row in set (0.00 sec)
