智能文章系统实战-小程序(10)
admin 发布于:2018-6-24 22:55 有 3207 人浏览,获得评论 0 条 标签: 小程序
1.配置页面
{
  "pages":[
    "pages/index/index",
    "pages/list/index",
    "pages/show/index",
    "pages/logs/logs"
  ],
  "window":{
    "backgroundTextStyle":"light",
    "navigationBarBackgroundColor": "#fff",
    "navigationBarTitleText": "WeChat",
    "navigationBarTextStyle":"black"
  }
}
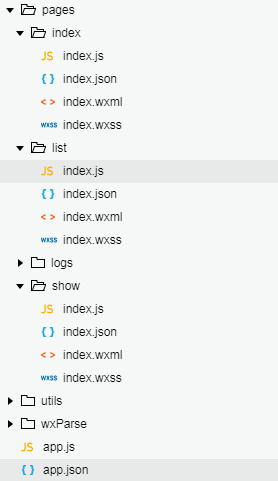
2. 文件目录
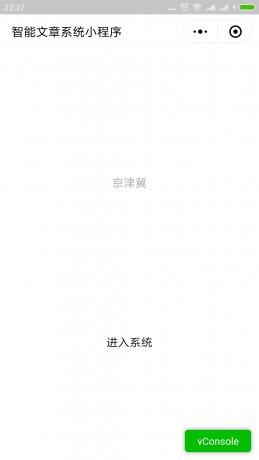
3. 首页内容
3.1 首页模板
<!--index.wxml-->
<view class="container">
  <view class="userinfo">
    <button wx:if="{{!hasUserInfo && canIUse}}" open-type="getUserInfo" bindgetuserinfo="getUserInfo"> 获取头像昵称 </button>
    <block wx:else>
      <image bindtap="bindViewTap" class="userinfo-avatar" src="{{userInfo.avatarUrl}}" mode="cover"></image>
      <text class="userinfo-nickname">{{userInfo.nickName}}</text>
    </block>
  </view>
  <view class="usermotto">
    <text class="user-motto" bindtap="enterSystem" >{{motto}}</text>
  </view>
</view>
3.2样式文件
/**index.wxss**/
.userinfo {
  display: flex;
  flex-direction: column;
  align-items: center;
}

.userinfo-avatar {
  width: 128rpx;
  height: 128rpx;
  margin: 20rpx;
  border-radius: 50%;
}

.userinfo-nickname {
  color: #aaa;
}

.usermotto {
  margin-top: 200px;
}
3.3处理程序
//index.js
//获取应用实例
const app = getApp()

Page({
  data: {
    motto: '进入系统',
    userInfo: {},
    hasUserInfo: false,
    canIUse: wx.canIUse('button.open-type.getUserInfo')
  },
  //事件处理函数
  bindViewTap: function() {
    console.log("bindViewTap")
  },
  onLoad: function () {
    if (app.globalData.userInfo) {
      this.setData({
        userInfo: app.globalData.userInfo,
        hasUserInfo: true
      })
    } else if (this.data.canIUse){
      // 由于 getUserInfo 是网络请求,可能会在 Page.onLoad 之后才返回
      // 所以此处加入 callback 以防止这种情况
      app.userInfoReadyCallback = res => {
        this.setData({
          userInfo: res.userInfo,
          hasUserInfo: true
        })
      }
    } else {
      // 在没有 open-type=getUserInfo 版本的兼容处理
      wx.getUserInfo({
        success: res => {
          app.globalData.userInfo = res.userInfo
          this.setData({
            userInfo: res.userInfo,
            hasUserInfo: true
          })
        }
      })
    }
  },
  getUserInfo: function(e) {
    console.log(e)
    app.globalData.userInfo = e.detail.userInfo
    this.setData({
      userInfo: e.detail.userInfo,
      hasUserInfo: true
    })
  }
  ,
  enterSystem: function (e) {
    wx.navigateTo({
      url: '../list/index'
    })
  }
})
3.4 配置文件 index.json
{
  "navigationBarTitleText": "智能文章系统小程序"
}
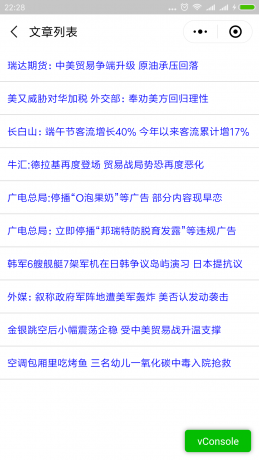
4. 列表页内容
4.1 配置文件 /pages/list/index.json
{
  "navigationBarTitleText": "文章详细内容"
}
4.2 模板文件 /pages/list/index.wxml
<!--pages/list/index.wxml-->
<scroll-view scroll-y="true" style="height:{{scrollHeight}}px;" class="list" bindscrolltolower="bindDownLoad"  bindscrolltoupper="refresh">
<block wx:for="{{list}}">
	<view class="weui_cell" data-url="{{item.id}}" bindtap="navTo">
		<view class="weui_cell_hd">{{item.title}}</view>
  </view>
</block>
</scroll-view>
4.3 样式文件 /pages/list/index.wxss
 /* pages/list/index.wxss */
.weui_cell {

    display: block;
    padding: 10px;
    -webkit-box-align: center;
    -ms-flex-align: center;
    align-items: center;
    border-bottom: 1px solid #dadada;
    line-height: 25px;
    height: 25px;

}

.weui_cell_hd {

    width: 100%;
    margin-right: 10px;
    text-align: left;
    float: left;
    font-size: 14px;
    color: #00F;
}
4.4 处理程序 /pages/list/index.js
// pages/list/index.js
var currentPage = 1
var GetList = function (that) {
  wx.showLoading({
    title: '加载中....',
  })
  wx.request({
    url: https://news.demo.com/app.php', //仅为示例,并非真实的接口地址
    data: { page: currentPage, pagesize: 10},
    header: {
      'content-type': 'application/json' // 默认值
    },
    success: function (res) {
      console.log(res.data)
      var errCode = res.data.errCode
      if (errCode == 0) {
        var oldList = that.data.list
        var tempList = res.data.data
        for (var i = 0; i < tempList.length; i++) {
          oldList.push(tempList[i]);
        }

        console.log(tempList);
        that.setData({ list: oldList })
        currentPage++

      }
      else {
        wx.showToast({
          title: res.data.errMsg,
          duration: 2000
        })
      }

      wx.hideLoading()


    }
  })


}


Page({

  /**
   * 页面的初始数据
   */
  data: {
    list: [],
    currentPage: 1
  },

  /**
   * 生命周期函数--监听页面加载
   */
  onLoad: function (options) {

    currentPage = 1;
    var that = this;
    wx.getSystemInfo({
      success: function (res) {
        console.info(res.windowHeight);
        that.setData({
          scrollHeight: res.windowHeight
        });
      }
    });
    console.log("onLoad");
  },

  /**
   * 生命周期函数--监听页面初次渲染完成
   */
  onReady: function () {
    console.log("onReady");
  },

  /**
   * 生命周期函数--监听页面显示
   */
  onShow: function () {
    console.log("onShow");
    currentPage = 1
    var that = this;
    GetList(that);
  },

  /**
   * 生命周期函数--监听页面隐藏
   */
  onHide: function () {
    console.log("onHide");
  },

  /**
   * 生命周期函数--监听页面卸载
   */
  onUnload: function () {
    console.log("onUnload");
  },

  /**
   * 页面相关事件处理函数--监听用户下拉动作
   */
  onPullDownRefresh: function () {
    console.log("onPullDownRefresh");
  },

  /**
   * 页面上拉触底事件的处理函数
   */
  onReachBottom: function () {
    console.log("onReachBottom");
  },

  /**
   * 用户点击右上角分享
   */
  onShareAppMessage: function () {
    console.log("onShareAppMessage");
  },

  bindDownLoad: function () {
    //   该方法绑定了页面滑动到底部的事件
    console.log("bindDownLoad");
    var that = this;
    GetList(that);

  },

  refresh: function (event) {
    //   该方法绑定了页面滑动到顶部的事件,然后做上拉刷新
    console.log("refresh");
    currentPage = 1;
    this.setData({
      list: []
    });
    GetList(this)
  },

  navTo: function (event) {
    var iid = event.currentTarget.dataset.url;
    console.log(iid)
    wx.navigateTo({
      url: '../show/index?iid=' + iid
    })
  }


})
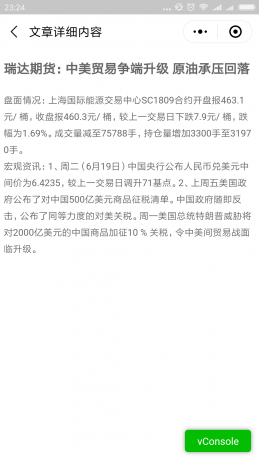
5. 详细页内容
5.1 配置文件
{
  "navigationBarTitleText": "文章详细内容"
}
5.2 模板文件
<!--pages/show/index.wxml-->
<import src="/wxParse/wxParse.wxml"/>
<view class="wxParse">
<template is="wxParse" data="{{wxParseData:article.nodes}}"/>
</view>
5.3 样式文件
/* pages/show/index.wxss */
@import "/wxParse/wxParse.wxss";
5.4 处理程序
// pages/show/index.js
var app = getApp();
var WxParse = require('../../wxParse/wxParse.js');

Page({

  /**
   * 页面的初始数据
   */
  data: {

  },

  /**
   * 生命周期函数--监听页面加载
   */
  onLoad: function (options) {

    console.log(options.iid)

    var that = this;

    wx.showLoading({
      title: '加载中....',
    })

    var that = this;
    wx.request({
      url: 'https://news.demo.com/h5.php?action=show&id='+options.iid, //仅为示例,并非真实的接口地址
      data: {},
      header: {
        'content-type': 'text/html' // 默认值
      },
      success: function (res) {
        console.log(res.data)
        WxParse.wxParse('article', 'html', res.data, that, 5);


        wx.hideLoading()

      }
    })

  },

  /**
   * 生命周期函数--监听页面初次渲染完成
   */
  onReady: function () {

  },

  /**
   * 生命周期函数--监听页面显示
   */
  onShow: function () {

  },

  /**
   * 生命周期函数--监听页面隐藏
   */
  onHide: function () {

  },

  /**
   * 生命周期函数--监听页面卸载
   */
  onUnload: function () {

  },

  /**
   * 页面相关事件处理函数--监听用户下拉动作
   */
  onPullDownRefresh: function () {

  },

  /**
   * 页面上拉触底事件的处理函数
   */
  onReachBottom: function () {

  },

  /**
   * 用户点击右上角分享
   */
  onShareAppMessage: function () {

  }
})
6.演示界面
7.总结
1. 首页获取 微信的基本信息用户
2. 列表是上拉自动加载内容
3. 由于微信不支持HTML显示,采用了wxParse插件解决。


